Push-to-card support
In this document you will learn what steps must be taken to support the "Push-to-card" transfer method in an API integration.
QualificationsThis guide is only relevant if the following criteria are met:
- You intend to support the
PUSH_TO_CARDtransfer method.- You are integrating with ReadyRemit via API and not SDK.
- You have no intention of receiving a PCI DSS Level 4 certification for your product.
Overview
1. Enable a Push-to-Card corridor
The first step to enabling the Push-to-Card transfer method for your users is turn on a Push-to-Card corridor. The ReadyRemit integration team can enable a test corridor for you in the Sandbox environment. Below is an example of a response from the GET /corridors endpoint that includes a Push-to-Card corridor:
curl --location --request GET 'https://api.readyremit.com/v1/corridors'  \
--header 'Authorization: Bearer TOKEN' \
--header 'Content-Type: application/json'[
{
"destinationCountry": {
"name": "United Kingdom",
"iso3Code": "GBR",
"iso2Code": "GB"
},
"sourceCurrency": [
{
"name": "US Dollar",
"iso3Code": "USD",
"symbol": "$",
"decimalPlaces": 2,
"roundDirection": "STANDARD"
}
],
"destinationCurrency": [
{
"name": "British pound",
"iso3Code": "GBP",
"symbol": "£",
"decimalPlaces": 2,
"roundDirection": "STANDARD"
}
],
"transferMethod": "PUSH_TO_CARD"
}
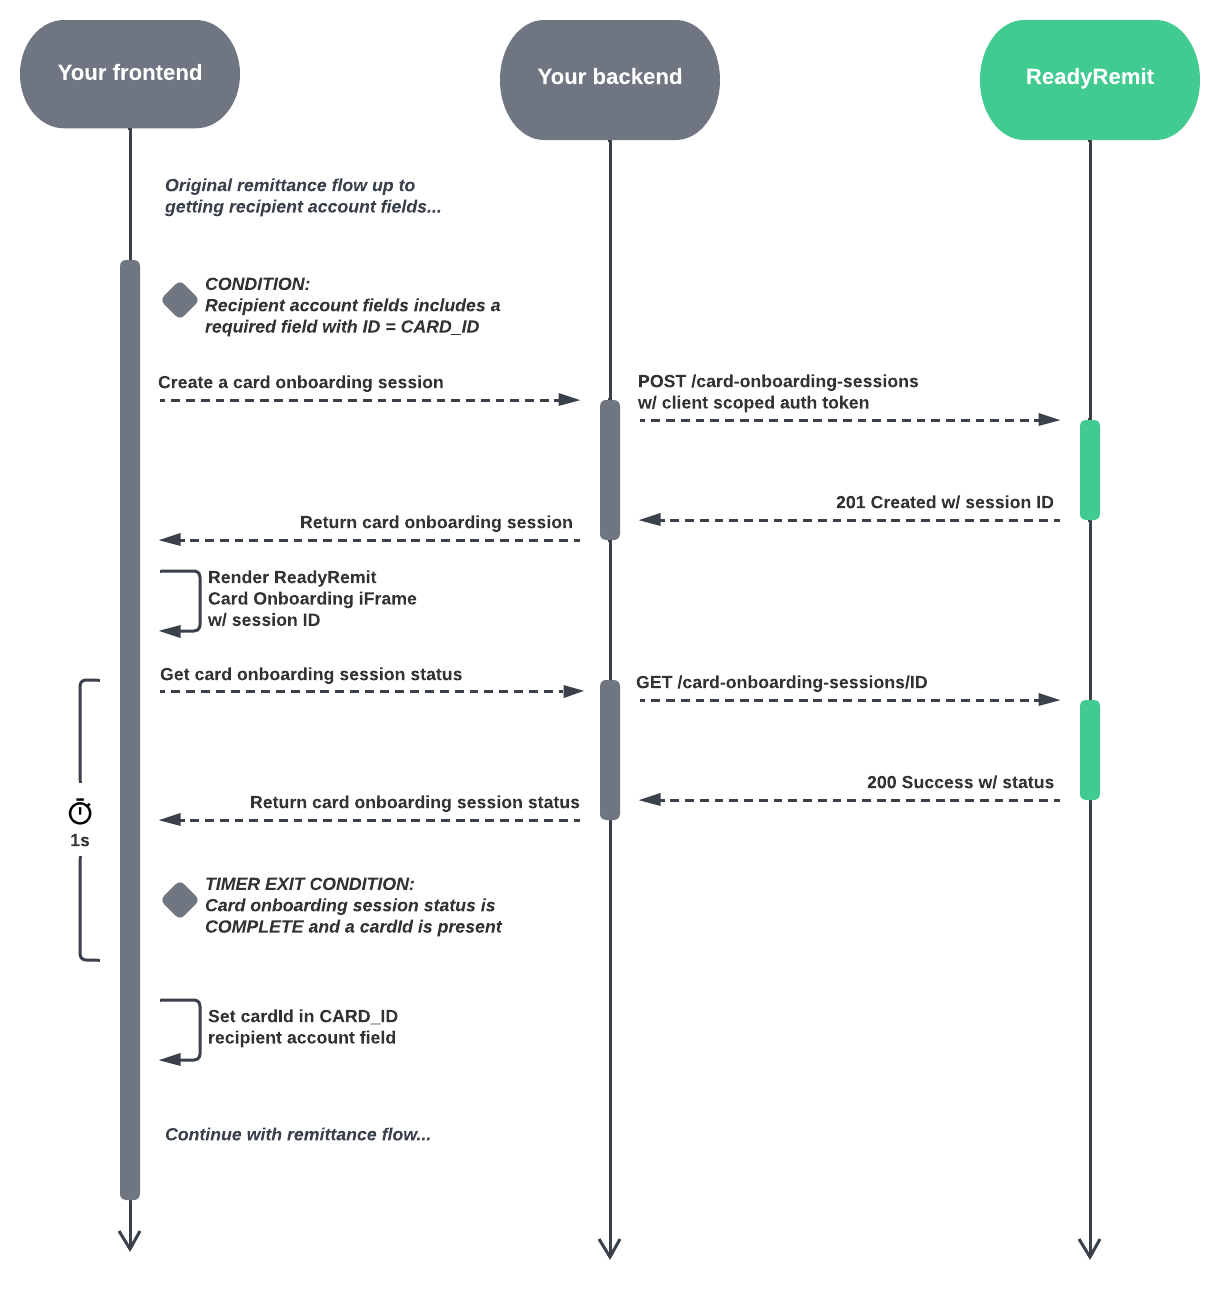
]2. The CARD_ID Recipient Account Field
The first 2 steps of the ReadyRemit transfer flow are unchanged for Push-to-Card:
The first change will come when creating a Recipient Account. As in the standard flow, use the Get Recipient Account Fields API endpoint to obtain a list of required fields to create a recipient account for the selected corridor. Below is an example of a response from the Get Recipient Account Fields endpoint for a PUSH_TO_CARD corridor:
curl --location --request GET 'https://api.readyremit.com/v1/recipient-account-fields?dstCountryIso3Code=GBR&dstCurrencyIso3Code=GBP&transferMethod=PUSH_TO_CARD&recipientType=PERSON' \
--header 'Authorization: Bearer TOKEN' \
--header 'Content-Type: application/json' {
"fieldSets": [
{
"fieldSetId": "CARD_DETAILS",
"fieldSetName": "Card Details",
"fields": [
{
"fieldType": "TEXT",
"fieldId": "CARD_ID",
"name": "Card Id",
"isRequired": true,
"visibility": "HIDE_AND_REQUIRED",
"placeholderText": "Card Id"
}
]
}
]
}Notice the field returned has a fieldId value of CARD_ID. The presence of this field is an indication that you will need to kick off the Card Onboarding flow starting in step 4 below.
FAQQ: Why is there a different flow for cards?
A: Unlike bank account numbers or other personally identifiable information, collecting a card number from a user falls under the scope of the Payment Card Industry Data Security Standard or PCI DSS. Being PCI DSS certified is required by regulating financial entities and ensures that your user's card information is not compromised. Acquiring a PCI DSS certification is a lengthy, expensive process so in an effort to remove this burden from you, ReadyRemit provides the Card Onboarding flow. The Card Onboarding flow pushes the PCI burden to ReadyRemit and allows you to enable Push-to-Card for your users without going through the process of PCI DSS certification.
3. Create a Card Onboarding Session
Card information must be entered using the ReadyRemit Card Onboarding iFrame. In order to launch the iFrame successfully, a Card Onboarding Session must be created through the API first. A new Card Onboarding Session should be created any time a user wants to enter card information. The response from the Create card onboarding session API includes an id property that will be used to launch the iFrame in Step 4 below.
NoticeMake sure to use entityMode = RECIPIENT when generating an onboarding session ID for creating a recipient card for Push to Card.
curl --location --request POST 'https://api.readyremit.com/v1/card-onboarding-sessions' \
--header 'Authorization: Bearer TOKEN' \
--header 'Content-Type: application/json' \
--data-raw '{
    "entityMode": "RECIPIENT"
}'{
status: 'INCOMPLETE',
id: 'c90a815b-1672-4596-b217-0bbd6f311667',
expirationDate: '2023-10-20T19:03:33.7557082Z',
cardId: null,
}4. Present the Card Onboarding iFrame to the sender
When the Get Recipient Account Fields returns a required CARD_ID field, the Card Onboarding iFrame will need to be presented to the user. This iFrame contains a form for entering card information and should blend in seamlessly to your existing flow. Render the iFrame with an iframe HTML tag and include the id from the Create CardOnboarding Session response in the URL path:
<iframe src="https://card.brightwell.com/v2/add-card/c90a815b-1672-4596-b217-0bbd6f311667"></iframe>The iFrame will accept a variety of URI encoded query parameters to customize the theme and branding of the content.
| Property | Type | Example / Default | Description |
|---|---|---|---|
font | string (font) | Mulish | The font must already exist within ReadyRemit or a font family file will need to be provided. |
primary | string (color) | # 934AE0 | Used for clickable elements, primary text links, etc. |
primaryLight | string (color) | rgba(147, 74, 224, 0.10) | Fill color for selected elements |
text | string (color) | # 0E0F0C | Used in headlines, labels, filled input fields. |
textSecondary | string (color) | # 454545 | Used in subheads, placeholder text, and form labels. |
foreground | string (color) | # FFFFFF | Used in main container as a fill color. |
background | string (color) | # F3F4F6 | Used for large surface area to provide contrast. |
inputLine | string (color) | # 858585 | Used for the outline of text input fields. |
divider | string (color) | # E2E2E2 | Used to differentiate elements from the background or divide sections. |
icon | string (color) | # 444444 | Used for all iconography, chevrons, close symbols, etc. |
success | string (color) | # 008761 | Used for success messages to indicate a positive sentiment. |
danger | string (color) | # AA220F | Used for error messages to indicate a negative sentiment. |
dangerLight | string (color) | rgba(170, 34, 15, 0.10) | Fill color for validation warnings |
buttonText | string (color) | # FFFFFF | Used to set the color of text on buttons |
buttonColor | string (color) | # 934AE0 | Used to set the color of buttons |
buttonRadius | string | 50px | Applies a radius to the corners of buttons |
buttonTextCase | string | Capitalize | UPPER, lower, Capitalize , Default. |
buttonFont | string (font) | Mulish Extrabold | The font must already exist within ReadyRemit or a font family file will need to be provided. |
buttonLetterSpacing | string (color) | 0 | Applies to primary, secondary, and tertiary buttons only, not text links. |
headlineFont | string (font) | Font override for the headline only | |
cardBackground | string (color or image URL) | url('<https://www.example.com/example.png>') | Applies a color or image to the card image |
lng | string | en | Sets the language of the iFrame. Options are en or es-MX |
showStep | integer (0 or 1) | 0 | Only enable if you want "STEP 3" to show as a header label for the iFrame |
showCardAnimation | integer (0 or 1) | 0 | Enables or disables the card image on the left container. Card animation will be forcefully disabled on mobile |
Below is an example of passing these values into the iFrame tag as URI encoded query parameters.
<iframe src="https://card.brightwell.com/v2/add-card/c90a815b-1672-4596-b217-0bbd6f311667?primary=%232563EB&primaryLight=%232563EB&text=%230E0F0C&textSecondary=%23454545&foreground=%23FFFFFF&background=%23F3F4F6&inputLine=%23858585÷r=%23E2E2E2&icon=%23444444&success=%23008761&danger=%23AA220F&dangerLight=%23AA220F&buttonText=%23FFFFFF&buttonColor=%232563EB&lng=en"></iframe>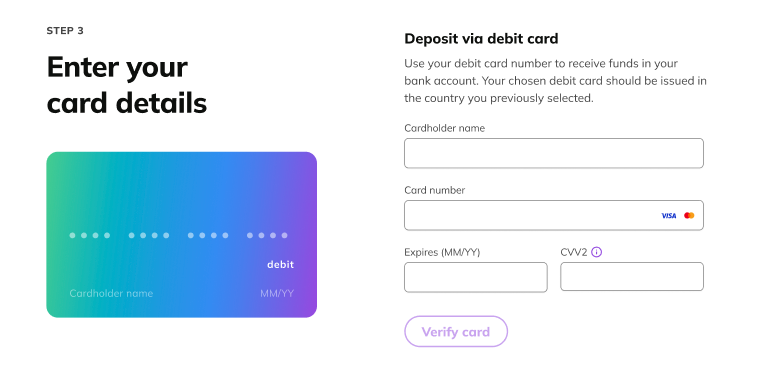
Card Onboarding iFrame (Desktop) with query parameters supplied
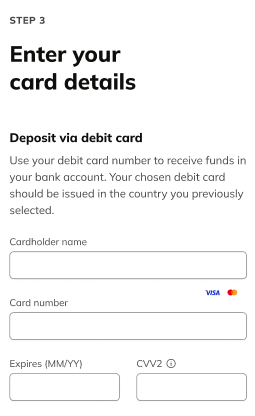
Card Onboarding iFrame (Mobile)
If there is an error loading the Card Onboarding iFrame, an error message will appear to the user.
5. iFrame Post Message Events
While the iFrame is mounted, a list of events will be emitted from the iFrame as the user tries to submit the page. This includes the events below:
- CARD_VALIDATION_START: This will be emitted when the user clicks the "Verify Card" button.
- CARD_VALIDATION_STOP_SUCCESS: This will be emitted after the user has successfully verified their card information.
- CARD_VALIDATION_STOP_FAIL: This event will be emitted have the user has tried to verify their card but has received a failure with the information provided.
- CARD_VALIDATION_STOP_EXPIRED: This event will be emitted when the expiration time and date for the card-onboarding-session have passed and the session will no longer work.
Example: How to Listen for iFrame Events
Below is an example of how you can listen for these iFrame events to be emitted and react appropriately based on your implementation. A snippet like the one below must be placed above the <iframe> snippet on the page and this example assumes the iframe is using an id of card-validation-iframe.
window.addEventListener('message', message => {
    if (message.data === 'CARD_VALIDATION_START') {
        // do something on succesffuly verification.
    }

     if (message.data === 'CARD_VALIDATION_STOP_SUCCESS') {
        // do something on verification falure.
    }

     if (message.data === 'CARD_VALIDATION_STOP_FAIL') {
        // do something when verification has failed
    }

     if (message.data === 'CARD_VALIDATION_STOP_EXPIRED') {
        // do something when the card on-boarding session has expired.
    }
});
Next steps
- To provide your users with the most accurate quote for Push-to-Card, a new quote should be presented to the user with the Recipient Account ID included.
- A transfer can now be made using the recipient account. Be sure to set the
transferMethodtoPUSH_TO_CARDin the transfer body.
Updated 4 months ago