Senders, Recipients, and Accounts
In order to support the ever-changing and dynamic requirements of moving money cross-border, entities in the PayMitto system aren't created in a way that's standard to most REST API's; this guide helps to clarify this process.
1. Get Fields
The first step to creating a new entity (Sender, Recipient, or Account) in PayMitto is to determine which fields are required for creating or modifying that specific entity. The following endpoints can be used to retrieve that data:
The responses from these endpoints will contain a collection of Field Sets and each Field Set will contain a collection of Fields. For more information, please visit the API reference document regarding Dynamic Fields. An example of a response from on of the Get Fields endpoints can be seen below:
{
    "fieldSets": [
        {
            "fieldSetId": "PERSONAL_INFORMATION",
            "fieldSetName": "Personal Information",
            "fields": [
                {
                    "fieldType": "TEXT",
                    "minLength": 1,
                    "maxLength": 50,
                    "fieldId": "FIRST_NAME",
                    "name": "First name",
                    "hintText": "Enter the recipient's first name as it appears on their ID",
                    "isRequired": true,
                    "visibility": "SHOW_AND_REQUIRED",
                    "placeholderText": "First name"
                },
                {
                    "fieldType": "TEXT",
                    "minLength": 1,
                    "maxLength": 50,
                    "fieldId": "LAST_NAME",
                    "name": "Last name",
                    "hintText": "Enter the recipient's last name as it appears on their ID",
                    "isRequired": true,
                    "visibility": "SHOW_AND_REQUIRED",
                    "placeholderText": "Last name"
                },
                {
                    "fieldType": "PHONE_NUMBER",
                    "minLength": 7,
                    "maxLength": 15,
                    "regex": "^[0-9]{7,15}$",
                    "fieldId": "PHONE_NUMBER",
                    "name": "Mobile phone number",
                    "isRequired": false,
                    "visibility": "HIDE_AND_OPTIONAL",
                    "placeholderText": "Mobile phone number"
                }
            ]
        }
    ]
}
Warning against saving or caching field requirementsThe Get Fields API endpoints are provided as a helpful tool for ensuring you are always requesting the right data for users based on the type of entity and destination of the funds. We discourage saving this response and re-using it as it is unknown when requirements might change.
2. Collect data
The result of the Get Fields API calls should be all the information needed to build a dynamic form and collect data from your users.
Note on reusabilityThe Dynamic Fields pattern is used in four different entity creation flows. It is recommended to build a reusable user experience that renders dynamic fields based on the response from these endpoints.
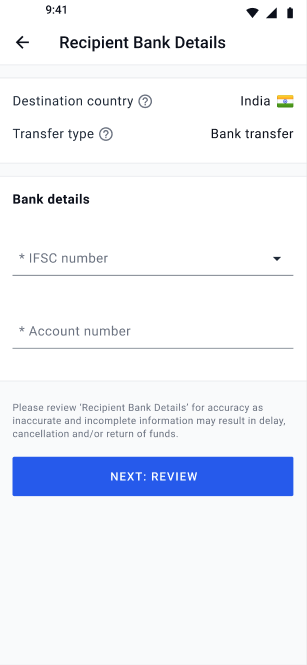
An example of a dynamic form can be seen below:
3. Create entity
Any entity creation flow that uses the Dynamic Fields patten will accept the resulting field values in a "fields" array. This array should contain an entry for every "required" field returned from the associated Get Fields API call. An example of creating a Recipient with data in the "fields" array of the request body can be seen below:
curl --location --request POST 'https://sandbox-api.readyremit.com/v1/recipients' \
--header 'Authorization: Bearer {{accesss_token}}' \
--header 'Content-Type: application/json' \
--data-raw '{
    "dstCountryIso3Code": "BEL",
    "dstCurrencyIso3Code": "EUR",
    "userType": "PERSON",
    "transferMethod": "BANK_ACCOUNT",
    "fields": [
        {
            "id": "FIRST_NAME",
            "type": "TEXT",
            "value": "John"
        },
        {
            "id": "LAST_NAME",
            "type": "TEXT",
            "value": "Doe"
        }
    ]
}'
If there is an error on the operation related to one of the fields, the error message will contain a "fieldId" so you can display the error at the appropriate place in your form. An example of an error related to a dynamic field can be seen below:
[
    {
        "code": "InvalidRecipientName",
        "message": "'First Name' is required when recipient type is 'PERSON'.",
        "fieldId": "FIRST_NAME"
    }
]
Updated 2 months ago