API: Business to Consumer
This integration guide enables the business-to-consumer integration type for customers choosing to do an API-only integration.
For the ReadyRemit Business to Consumer (B2C) API flow, integration with ReadyRemit must take place on your server to avoid exposure of unique IDs, personal information, or access tokens.

Step 1: Securely store API credentials
ReadyRemit API credentials will be provided to you by the ReadyRemit Integrations Team when your integration starts. For more information, please see our documentation on Storing API credentials.
Step 2: Collect Sender ID from ReadyRemit Integrations Team
In a B2C transfer, you the customer are the "Sender" of the Transfer so you won't need to build a Sender record yourself through the API. The ReadyRemit Integrations Team will provide you with a Sender ID that should be included in all of your requests for an authentication token.
The Sender ID will be unique per Environment.
Please see the next step and the documentation on Authentication for more information on including the Sender ID in your authentication request.
Step 3: Authenticate
An access token can be retrieved from the ReadyRemit API using the Client ID and Client Secret provided to you by the ReadyRemit Integrations Team when access to a new Environment was granted. It is recommended to get a new OAuth Access Token for each unique intention.
Please see the documentation on Authentication for more information.
Access Token ExpirationBe aware that the OAuth Access Token will expire after 24 hours. It is unlikely that a standard remittance flow will require a refreshed token but if that does happen, a new token can be retrieved.
Token SecurityIn the wrong hands, the ReadyRemit API Access Token generated for the B2C use case can be used to see personal information about your users or create fraudulent transfers. Be sure to only store the access token on your secure server and never expose it in the front-end.
Step 4 (Optional): Select a Recipient
If your user has already gone through the remittance flow and created a Recipient record, they should be allowed to select this existing Recipient. You can use the Get Recipient API in conjunction with the Get Recipient Accounts endpoint to present this list to your user.
Note: this step is marked optional because technically the end-user could re-create the recipient each time but for best user experience this is not a recommended approach.
Step 5: Build a Quote
Our research shows that users are more likely to complete a cross-border remittance flow once they've seen and committed to a final rate and receive amount. For this reason, we encourage building and showing the user a Quote at the beginning of the flow.
Please see the documentation on Building a quote for a detailed walkthrough of the process.
Step 6: Create or Select a Recipient
A Recipient record represents the person receiving the funds of a transfer. This should be information about the person that doesn't change from one account to the next. In the ReadyRemit system, a Recipient can have multiple accounts. To create a Recipient, follow the steps in the Building Senders, Recipients, and Accounts documentation using the following two endpoints:
When a Recipient is created a Recipient ID will be returned. You should store this ID in your system and associate it with your user. Be aware that a user might want to create more than one recipient so Recipient ID should be stored in a one-to-many format.
Step 7: Select or Create a Recipient Account
Cash PickupThis step is not required if the Corridor selected in Step 2 has a "Transfer Method" of type
CASH_PICKUP. The API to fetch Recipient Account Fields for Cash Pickup transfers will return an empty list.
Recipient Accounts in ReadyRemit represent the final destination of the funds in a transfer. Examples of Recipient Accounts include bank accounts, cards, or digital wallets (note: cash pickups do not require a Recipient Account). Multiple Recipient Account records can be created for a single Recipient.
To create a Recipient, follow the steps in the Building Senders, Recipients, and Accounts documentation using the following two endpoints:
If you are presenting your users with a list of previously created Recipients, you can include their recipient accounts by calling the Get Recipient Accounts endpoint and passing in the Recipient ID collected in Step 3.
Step 8: Collect additional Transfer information
Some transfers require additional fields submitted with the transfer. To get a list of required fields for your transfer, call the Get Transfer Fields endpoint. For more information on rendering dynamic forms, see the documentation on Building Senders, Recipients, and Accounts and the reference material on Dynamic Fields.
Not always requiredIf the result from the Get Transfer Fields call returns no fields, this step can be skipped.
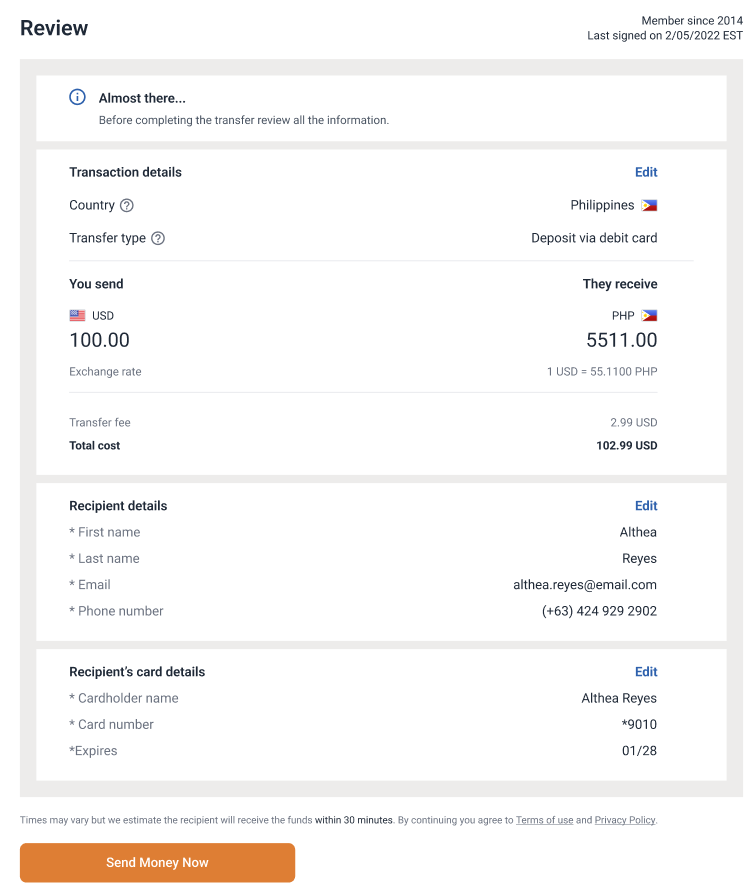
Step 9: Transfer review and acceptance
Once these steps have all been completed, you should have collected enough information from your user to complete the transfer. Before completing the transfer, it is very important to allow the user to review the details of the transfer to satisfy the requirements of the Remittance Transfer Rule. The following elements must be confirmed by the end user before the transfer can be sent:
- Total cost
- Exchange rate
- Receive amount
Below is a recommended design for the review screen:
Step 10: Secure funds
Once the user reviews and accepts the Transfer details, you are ready to complete the transfer. Before sending the API call to ReadyRemit, you must take any necessary action to ensure that funds are available for the Transfer and these funds are made unavailable to the user.
The amount to secure can be found in the response from the Get Quote endpoint in the totalCost field.
Step 11: Submit the Transfer
Once funds have been secured, call the Create Transfer API to create the final Transfer.
Handling rate changesIt's possible that the exchange rate changes between the time the user reviewed it and the time the transfer is submitted. If this happens, the ReadyRemit API will return an error with a specific code indicating the rate changed.
When this happens, it is required that you request a new Quote from the Get Quote API and display the new rate, receive amount, and total cost to the user.
The result of the transfer creation includes a "Transfer ID" that can be saved and used later to show transfer details to your user.
Important: If there is any failure returned from the Create Transfer API call, the funds should be credited back to the user.
Step 12: Provide a receipt
It is a compliance requirement that a transfer receipt be made available to users in such a way that it is in a retainable form and in a format that is capable of being printed. The ReadyRemit Integrations Team recommends providing a PDF receipt that your users can download to meet this requirement. All of the details needed to render the receipt are present in the response from the Create Transfer endpoint.
Please see the documentation on Receipt Compliance for a detailed description of exactly what needs to be on the receipt.
Step 13: Certification
Due to the highly regulated nature of moving money cross-borders, your integration with ReadyRemit will need to be certified by the ReadyRemit Integrations Team before access to the Production environment can be granted. To begin the certification process, please provide a certification-ready environment with login credentials to the ReadyRemit Integrations Team.
Security WarningThe certification environment you provide should include test data only.
The following things will be tested during certification:
- Screens and UI flows meet compliance requirements
- API requests include expected information
- Information shown to the user matches what was returned in the API
- All expected disclaimers and disclosures are displayed in the appropriate places
Step 14: IP Whitelisting
No IP whitelisting is required in the Sandbox environment, but IP whitelisting is required for production environment access. Whitelisting needs to happen on both your server and on ReadyRemit's server. When you are ready for this step, please provide your full set of production server IP addresses to the ReadyRemit Integration Team in a secure email, and you will receive an email back with ReadyRemit production IP addresses.
Updated 4 months ago