SDK: Consumer to Consumer
This integration guide enables the consumer-to-consumer integration type for customers choosing to do an SDK integration.
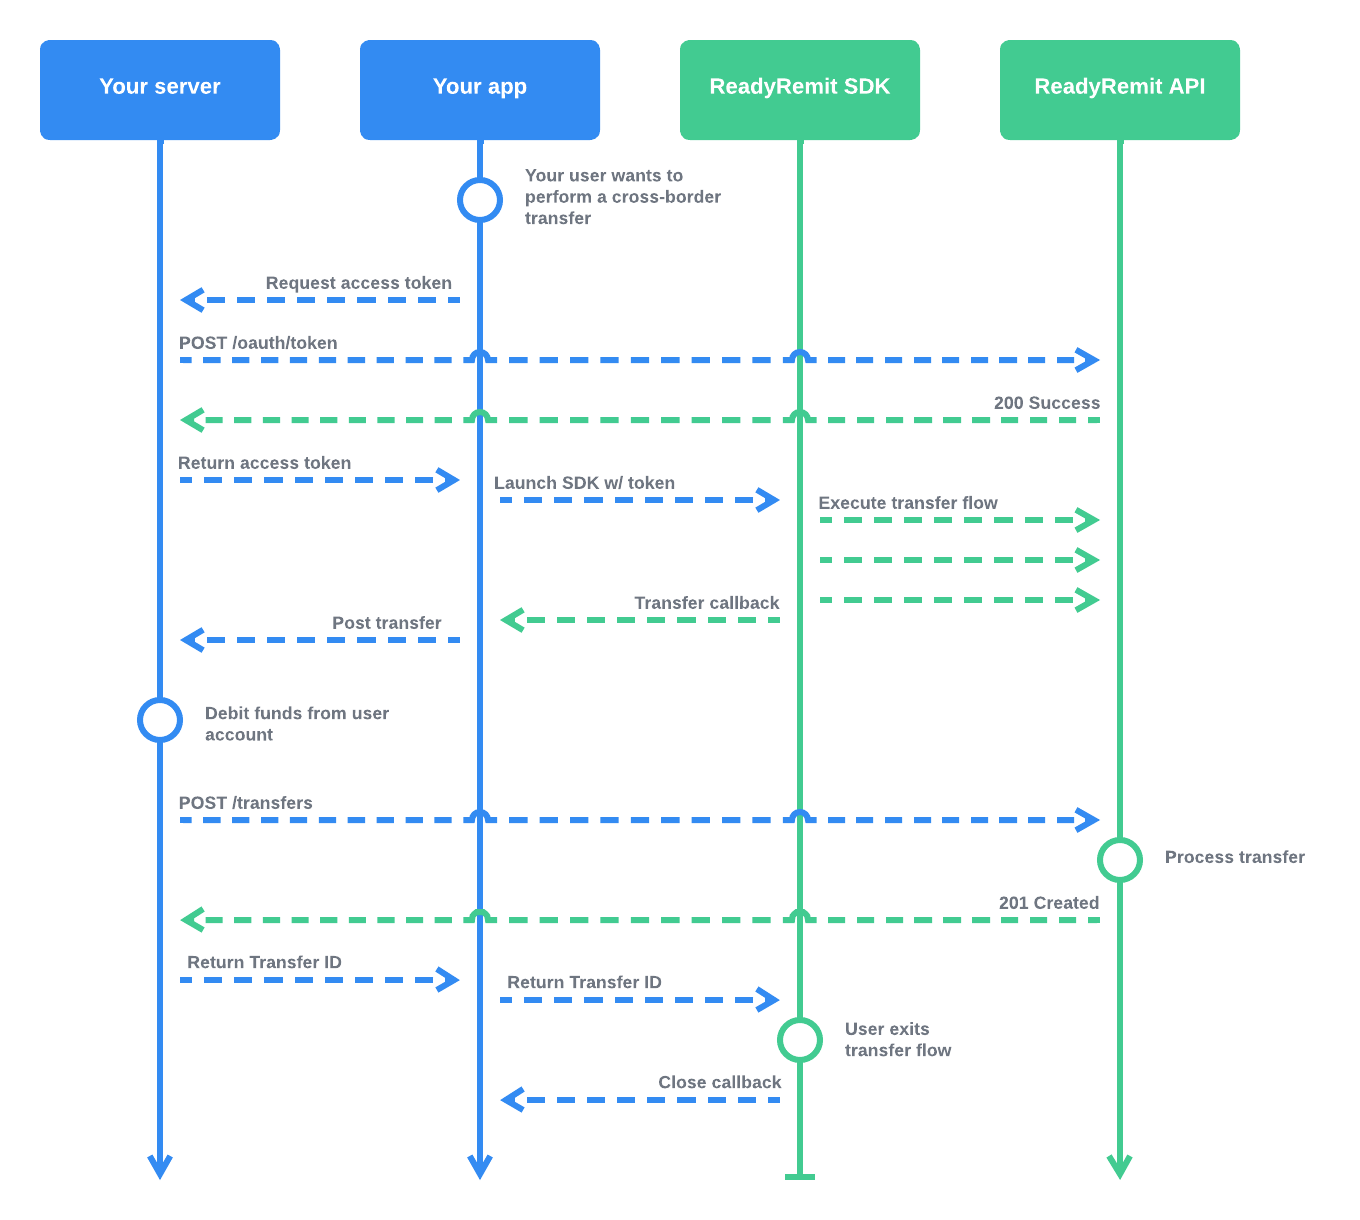
The ReadyRemit SDK takes care of 90% of the payments flow without intervention from your developers. There are three operations that the SDK does not handle: authentication, sender creation, and transfer submission. These are delegated to your server in order to ensure the security of your users funds and are the minimum required endpoints to integrate with. For a full list of available ReadyRemit APIs, please see the API Reference.
Step 1: Securely store API credentials
ReadyRemit API credentials will be provided to you by the ReadyRemit Integrations Team when your integration starts. For more information, please see our documentation on Storing API Credentials.
Step 2: Authenticate
An access token can be retrieved from the ReadyRemit API using the Client ID and Client Secret provided to you by the ReadyRemit Integrations Team when access to a new Environment was granted. It is recommended to get a new OAuth Access Token for each unique intention.
Please see the documentation on Authentication for more information.
Access Token ExpirationBe aware that the OAuth Access Token will expire after 24 hours. It is unlikely that a standard remittance flow will require a refreshed token but if that does happen, a new token can be retrieved.
Token SecurityIn the wrong hands, the ReadyRemit API Access Token generated for the C2C use case can be used to see personal information about your users or create fraudulent transfers. Be sure to only store the access token on your secure server and never expose it in the front-end.
Step 3: Create Sender records to associate with your user
Sender records represent the entity that owns the funds for the transfer. In the C2C use case, the sender is the individual initiating the Transfer and whose account or value store will be debited when the Transfer is executed.
It is recommended to create a Sender record with the ReadyRemit API using the Create Sender endpoint when your user attempts to launch the remittance flow for the first time.
Required fieldsThe fields required to create a Sender with ReadyRemit are identical across all corridors. Use the Get Sender Fields endpoint to see the full list of required fields. Most information required to create a Sender should already have been collected by your system during user onboarding. The user might need to be prompted for any additional fields (see the guide on Building Senders, Recipients, and Accounts for tips on this process).
When a Sender record is created successfully, you will be provided a unique senderId. This ID should be saved in your system and associated with the user who initiated the remittance.
Sender authenticationThe access token created in Step 2 is a "Client level" access token, meaning it can be used to view, update, and delete data belonging to any Sender under your customer account. Once a sender exists in the system, it is highly recommended that a "Sender level" access token be used for all other remittance operations through the ReadyRemit API. For more information on obtaining a Sender level access token, see the guide on Authentication.
Step 4: Integrate ReadyRemit in your app
The ReadyRemit SDK provides an end-to-end cross-border transfer experience for your users. The SDK can be integrated into your app by following the platform appropriate guide below:
In order to initialize the SDK successfully, you will need to first acquire a "Sender level" access token from the ReadyRemit API (see section above on authentication).
Once the user launches the ReadyRemit SDK, the entire remittance flow is owned and maintained by ReadyRemit up to the point of submitting the Transfer.
Step 5: Secure funds
Once the user reviews and accepts the Transfer details, the ReadyRemit SDK will fire the READYREMIT_TRANSFER_SUBMITTED callback to your mobile app. The request body in this callback payload should be sent to your server for final submission to the ReadyRemit API. Before sending the API call to ReadyRemit though, you must take any necessary action to ensure that funds are available for the Transfer and these funds are made unavailable to the Sender.
The amount to secure can be found in the payload from the ReadyRemit SDK in the amount field of the quote object.
Decimal normalizationBe aware that the value in the
amountfield of the quote is "decimal normalized" to eliminate any programming language errors. For more information on how to interpret currencies in the ReadyRemit API, see this page in the documentation.
Step 6: Submit the Transfer
Once funds have been secured you can call the Create Transfer API to create the final Transfer.
The result of the Transfer creation includes a "Transfer ID" that can be saved and used later to show transfer details to your user.
The response from the Create Transfer API will include the full details of the transfer and a transferId. This Transfer ID must be returned to the ReadyRemit SDK in order to finalize the transfer flow.
Important: If there is any failure returned from the Create Transfer API call, the funds should be credited back to theSender and a user readable error message returned back to the ReadyRemit SDK.
Updated 27 days ago